Wednesday, December 14, 2016

How to Read your Knitting Part 7

Here's another stitch pattern for us to work through. It's a classic stitch pattern which turns up in many stitch dictionaries. I've seen it most often named Seafoam. My swatch has a border of garter stitch. As usual to learn the most from this exercise, it works best if you have the work in your hands.


Seafoam Stripes (10 + 6)

Row 1 (RS):  Using Colour A, k6, * yo, k1, yo twice, k1, yo 3 times, k1, yo twice, k1, yo, k6; rep from *, k3.
Row 2 (WS): Using Colour A, knit to final marker dropping all yarn overs.
Row 3: Using Colour B,  knit to end of row.
Row 4: Using Colour B, knit to end of row.
Row 5: Using Colour A ,  k1, * yo, k1, yo twice, k1, yo 3 times, k1, yo twice, k1, yo, k6; rep from *, end last repeat as k1.
Row 6: Using Colour A, knit to final marker dropping all yarn overs.
Row 7: Using Colour B, knit to final marker.
Row 8: Using Colour B, knit to final marker.

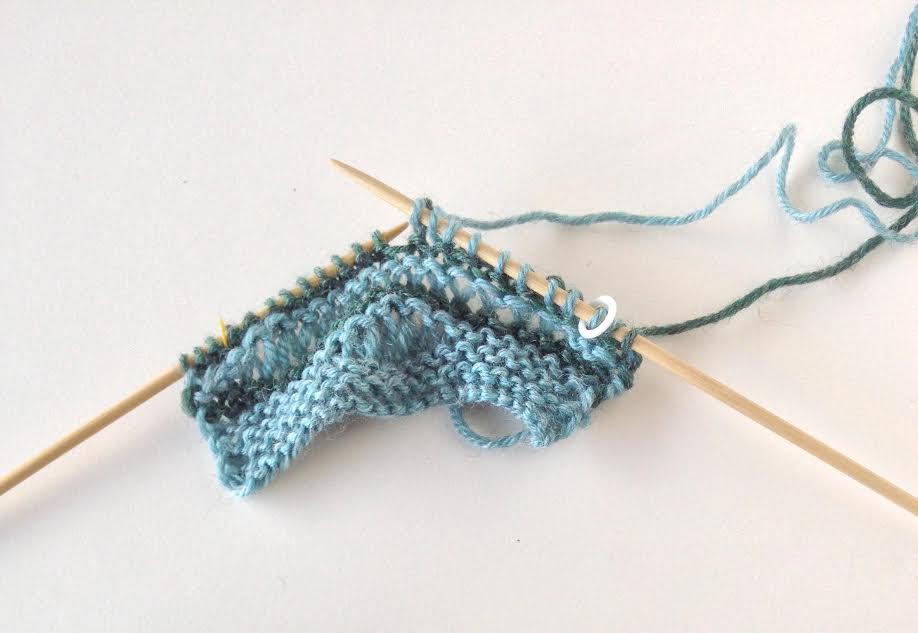
Here I've worked one repeat so you can see the stitch pattern starting. As in the last pattern it's staggered in a brick laying pattern. You can click on the photos to make them larger. I've worked the k6 of Row 1 below.


Here's the first yo, k1.


Next I've done the yo twice, k1, yo 3 times.


Then I've worked Row 1 to the end and I'm on Row 2. The first 6 stitches are knit. Now I'm at the yo which will be dropped from my needle.


The way to know quickly which stitches to drop and which ones to knit? Look for the purl bump in a different colour from the previous row.


It's easier to identify the yo with the extra wraps because they get so large. My most common mistake with this pattern was to accidentally knit the single yo and increase my work by a stitch or two. Once I started reading my knitting by watching for and knitting only into the stitches with the opposite colour purl bump at the bottom I stopped making that mistake.


Friday, December 9, 2016

An Interview with...Cristina Ghirlanda

http://www.ravelry.com/patterns/library/cala-luna-2

Once a week I post interviews with interesting people about their insights on their experience of working in the Knitting industry. I’ve noticed that every one of these individuals makes their living in a slightly different manner bringing their own unique presence to the knitting world.

You can find Cristina here and here  on Ravelry. 


http://www.ravelry.com/patterns/library/gacoco-baby-blanket

Where do you find inspiration?
Most of the time inspiration comes when I am not working. That is why it is important for me to have idle time.

What is your favourite knitting technique?
It is hard to choose a favourite. I love every aspect of knitting and I love trying out new techniques. Simply handling the yarn makes me happy.

Do you look at other designers’ work or are you afraid that you will be influenced by their designs?
I love looking at other's work and often I am astonished by the harmony of their designs. It helps to train my eyes to recognize a good design.


http://www.ravelry.com/patterns/library/cadenza-4

How do you feel about the so called controversy of “dumbing down” patterns for knitters?
I think that the reason many knitters buy patterns is because they want to have everything figured out to make the knitting process as mindless as possible.

How many sample/test knitters do you have working for you or do you do it all yourself?
I use sample knitters only occasionally. I like knitting and I enjoy knitting my samples. Besides aesthetic, I want to verify whether a pattern is interesting or boring to knit (I always write the whole pattern before casting on). I run test knits mostly as a preview of the pattern and I have met many wonderful testers during the process.

Do you have a mentor?
No, I don't have any mentor but I have to thank my first tech editor Charlotte Quiggle. It was her encouragement that got me started in this career. I have learned a lot on pattern writing from her.

Do you use a tech editor?
Absolutely. I cannot imagine publishing a pattern without a reliable tech editor.


http://www.ravelry.com/patterns/library/ebony-7

How do you maintain your life/work balance?
As a mother of a small child, it is impossible to work too much. Kids are very good at keeping our lives balanced. They give you plenty of playing time and outdoor time.

How do you deal with criticism?
I don't take opinions too personally. It is impossible to please everyone.

How long did it take for you to be able to support yourself?
It took me almost three years of part time work to be able support myself.

What advice would you give someone who wants to pursue a career in knitting?
Don't listen too much to the advice otherwise you will not even get started. It is possible to have a career in knitting and many people have done that. You can be the next one.


http://www.ravelry.com/patterns/library/minimissimi-sweater-coat

Wednesday, December 7, 2016

How to Read your Knitting Part 6

Here's another stitch pattern for us to work through. It's a simple eyelet stitch pattern. The motifs are offset in what is often referred to as a half drop pattern. You could also think of it as a brick laying pattern. The motif would sit in the centre of each brick.


I've used a garter stitch border around the pattern stitches as in my last post. I didn't include it in the stitch pattern below. Working two sets of instructions simultaneously is another skill which will simplify your knitting. I use markers to define those borders.


Eyelet Stitch (multiple of 8)

Row 1 (RS): Knit.
Row 2 (WS) and all other wrong side rows: Purl
Row 3: K3 * yo, ssk, k6; rep from *, end last repeat as k3 instead of k6.
Row 5: K1, * k2tog, yo, k1, yo, ssk, k3; rep from *, end last repeat as k2 instead of k3.
Row 7: K3 * yo, ssk, k6; rep from *, end last repeat as k3 instead of k6..
Row 9: Knit. 
Row 11: K7 * yo, ssk, k6; rep from *, end last repeat as k7 instead of k6.
Row 13: K5, * k2tog, yo, k1, yo, ssk, k3; rep from *, end last repeat as k6 instead of k3.
Row 15: K7 * yo, ssk, k6; rep from *, end last repeat as k7 instead of k6.
Row 16: Purl.


When you review a stitch pattern it often helps the knitting if you start to take note of how the pattern works. First thing to notice is all the wrong side rows are purl. That means it's a stocking stitch base and 50 % of the rows will be plain purl only. Rows 1 and 9 are all knit, that means 60 % of the knitting is stocking stitch. Notice next that Rows 3, 7, 11 and 15 are the same stitch pattern repeat from the * forward. Next, 5 and 13 are the same as one another from the * forward. While it takes 16 rows to write out, this is a fairly easy stitch to learn. Rows 3, 5, 7, 11, 13 and 15 only vary slightly at the beginning and end of the row to balance the motif across the work. There are really only two pattern rows to learn. When you think it through that way the stitch patterns feels much easier than it looks to be from a cursory look at the text instructions.


The knitter's rule here is, size doesn't matter...really!


Once you get knitting, you should start to work on the relationships of the pattern stitches. First, you establish a yarn over followed by an ssk (Row 3). The decrease keeps the stitch count consistent. If you are using markers you can count the stitches when you work the wrong side purl rows to ensure everything is correct. A wrong stitch count tells you there's an error. Stop and assess. My common error is to accidentally drop the strand of yarn making the yarn over. If you do, pick it back up and put it on your needle. I find this easier to do from the right side of the work to be sure I get it to the right of the decrease and with the correct stitch orientation.


If you look at the motif when you get to the next pattern row (Row 5), you can see the k2tog has to be in front of the yarn over from the previous RS row. Next, there is another yarn over and then a knit. That knit gets worked into the stitch immediately above the yarn over of the previous RS row. If it doesn't, you've made a mistake so it's time to go back and fix it.


The next thing to notice is the ssks make a fairly strong diagonal line in your knitting leaning to the left. As you work them make sure this line is maintained. As usual this makes way more sense if you create a sample and work through the process yourself. Click on the photos to make them larger.


Here I'm starting the next motif (Row 11) which will fall in the centre of the two from the previous row. If you visually follow the stitch up from the ssk column you will notice that you work one more knit stitch, then the yarn over and then the next ssk. If it doesn't it's time to look for an error. There is only one motif in this repeat because there isn't enough room at the edges for a full motif to be worked. Once you recognize these relationships you are well on your way to reading your knitting. You won't stop referring to the stitch pattern, but you will catch your errors much more quickly once you have a road map of stitch relationships in your head. 


http://knittingrobin.blogspot.ca/2016/10/how-to-read-your-knitting-part-1.html
http://knittingrobin.blogspot.ca/2016/10/how-to-read-your-knitting-part-2.html 
http://knittingrobin.blogspot.ca/2016/11/how-to-read-your-knitting-part-3.html 
http://knittingrobin.blogspot.ca/2016/11/how-to-read-your-knitting-part-4.html
http://knittingrobin.blogspot.ca/2016/12/how-to-read-your-knitting-part-5.html
http://knittingrobin.blogspot.ca/2016/12/how-to-read-your-knitting-part-6.html
http://knittingrobin.blogspot.ca/2016/12/how-to-read-your-knitting-part-7.html
http://knittingrobin.blogspot.ca/2016/12/how-to-read-your-knitting-part-8.html


Monday, December 5, 2016

How to Read your Knitting Part 5

This reading your knitting tip came from a discussion with another knitting teacher. The question was about how to help knitters keep track of RS and WS shaping instructions. 

The specific project was a garter stitch, asymmetrically shaped triangle shawl worked from a narrow tip to a wide cast off edge. You decrease on RS rows on every fourth row and increase on the opposite side on every row (RS and WS rows). Most knitters put a safety pin on the RS to keep track of the sides. The pin needs to be moved as the work progresses and the knitter has to remember to look for it and confirm if they are on the RS or WS.

My sample below is for a top down asymmetrical triangle. This one is more complicated because it has patterning to be worked on both the right and wrong side as well as different shaping instructions for each edge.


My tracking detail is the colour of the markers.  Look closely (click on the photo to make it larger) and you can see some of my yellow markers on the right side of the sample. Most of the green and blue ones are not visible. I've worked just past the centre stitch and I've switched to blue and green markers. I've got a marker at every eighth stitch repeat so there are several of them on each half. My rule for all projects is to use warm colour markers on the RS for the first half and then switch to cool colour markers for the second half. When I begin a row the first marker colour immediately tells me if I am working a RS (warm colour) or WS (cool colour) row. 

http://knittingrobin.blogspot.ca/2016/10/how-to-read-your-knitting-part-1.html
http://knittingrobin.blogspot.ca/2016/10/how-to-read-your-knitting-part-2.html 
http://knittingrobin.blogspot.ca/2016/11/how-to-read-your-knitting-part-3.html 
http://knittingrobin.blogspot.ca/2016/11/how-to-read-your-knitting-part-4.html
http://knittingrobin.blogspot.ca/2016/12/how-to-read-your-knitting-part-5.html
http://knittingrobin.blogspot.ca/2016/12/how-to-read-your-knitting-part-6.html
http://knittingrobin.blogspot.ca/2016/12/how-to-read-your-knitting-part-7.html
http://knittingrobin.blogspot.ca/2016/12/how-to-read-your-knitting-part-8.html