Showing posts with label Designer Secrets. Show all posts

Monday, August 23, 2010

Designer Secrets - The Gauge Swatch (and why we won't stop harping at you that have to do one!)

These are the swatches that I use when I teach my design class.


These three are the same number of rows, same number of stitches on three different needle sizes
(7.5 mm, 6 mm and 4 mm).


These two are the same number of rows, same number of stitches, one in garter stitch and the other is two cables on a background of reverse stocking stitch.


These two swatches are the same number of rows, same number of stitches.....can you tell me what's different? I'll post the answer on Wednesday.


Wednesday, August 18, 2010

Designer Secrets - Smoothing Stair Step Cast Offs

Please note the little stair steps created by each bind off in the photo above and then compare to the photo's below.


I'm working on cardigan designs and I was thinking about details that I need to discuss with my sample knitters. I wanted to give them a reference on smoothing the stair step bind offs at the armhole, neckline and shoulders so I went to my usual resource the Vogue Knitting reference book. The first time I couldn't find anything but I checked again before I wrote this post and finally found it under "Sloped bind off". It's the kind of little detail that is never included in a pattern but makes seaming easier as well as tidier on the inside of your garment. It also turns out that Vogue uses a different technique than the one I use.


Their version (page 50) means thinking ahead to the row before the bind off and skipping the last stitch, turning the work slipping the next stitch and then passing the skipped stitch over the slipped one and then continuing the bind off.


The version I use is - I complete the first bind off as normal and then on the next "step" on a right side row I work the first decrease as a SSK and then complete the bind off normally. On the wrong side rows I do a P2 together. So if the instruction was to bind off 4 stitches and then 3 on the next row I would bind off 4 stitches and then on the next row SSK (RS) or P2 together (WS) and bind off 2 stitches.


BTW Canadians often say cast off instead of bind off, stocking stitch instead of stockinette and occasionally tension instead of gauge.


Wednesday, August 11, 2010

Designer Secrets - The Chest vs. the Bust measurement


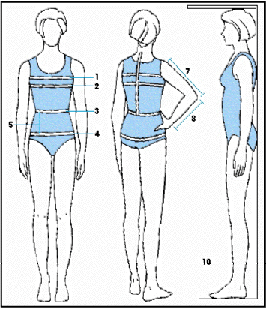
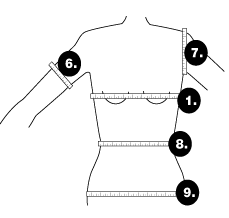
The chart on the right comes from here The one on the left is from here It's the CYCA chart that many Knitting designers use as a standard when grading all patterns. The one on the right shows a chest measurement at 1 and a bust measurement at 2. CYCA shows only a bust measurement.

I rarely knit from patterns. On the odd occasion I do it's usually because the design has a feature or technique I'm really interested in trying. The last pattern I knit was this
one It's beautiful!


As you can see with this design the pattern size choice based on a bust measurement makes sense but it doesn't for every pattern. In particular those with set in sleeves. I've been custom designing for my own unique measurements for so long that I'd forgotten how difficult it can be for Knitters to choose the correct size when using patterns. When I was taking sewing classes I was taught to take both bust and chest measurements to aid in choosing the correct pattern size especially if you were over a B cup. The thinking was that while bust measurements gave you the width required the chest measurement was more closely based on bone structure size. Normally it is easier to make the bust bigger than it is to change the shoulder, armhole and sleeve cap relationship. If I use the CYCA standards I drop a size by using the chest measurement. My back waist length isn't even on the chart because I'm 5'2". If I look at my upper arm measurement I go up a size? I sound like I must be some sort of a science fiction mutant don't I? Well I'm not... I'm pretty average. So what I'm getting at here is that it doesn't really matter what standard measurements a designer starts from because the reality is that almost every knitter will need to make some adjustments to fit their pattern to their body. You will always need to compare your measurements to the patterns and adjust accordingly. So try taking a chest measurement especially if your sweaters don't fit at the shoulders and neck and see if that changes the size you would change on the pattern. See this previous posting for an adjustment idea if you need more space in the bust area only and this one here for making your sweater fronts bigger.

Wednesday, June 30, 2010

Designer Secrets - The Drop of the Fabric


Occasionally I read postings on Ravelry about garments that "grew" after completion. My next pattern is for a scarf that gets longer once it is worn as it is a lengthwise design. I've included a note to warn the knitter about the difference between the flat and the hanging gauge.


I have a shawl that I made from a novelty yarn a few years ago and I wear it as a scarf as well because just turning it and letting it hang... completely changes its gauge. During the last poncho craze I tied two edges together with black satin ribbons and wore it as a poncho. Take a look at the photo at the top of the posting and the one just below for comparison. You wouldn't think a piece of knitting could change that much would you?


Drop is often a problem for many Knitters and the first time they encounter this property of knitted fabric it is an unwelcome surprise. The knitting lengthens due to the hanging weight of the fabric. It also becomes much narrower. On a garment the body inhibits this property to some degree but it means that sleeves can become too long and hems end up in unintended places. Shoulders can narrow on sleeveless tops or pull down being dragged out of placement by the weight of the sleeve. The amount of drop can vary and is due to the stitch pattern, the yarn fiber, the density of the knitting, the size of the garment and the direction of the knitting construction. The drop is more pronounced at the top of a garment than it is at the bottom meaning that the designer may use more than one gauge for the various parts of the design. A cap sleeve could be based on a flat gauge while the body might be based an a hanging swatch with weight added to simulate the weight accumulating over the length of the garment body.

Yarn substitutions of different fibers can create this problem on a pattern that would have had no drop with its original yarn choice. Patterns normally adjust for drop but the specifics are hidden between the details of gauge, the knitting instructions and the finished measurements and can lead to Knitter dissatisfaction with the end product. Samples are rarely knit in every size and that is the only way to be sure how drop will affect each one. Most samples are knit for 34" bust sizes so the adjustments for the larger sizes are done mathematically on a percentage basis. It may mean that the drop will be much greater on larger sizes.

Has this happened to you?

Monday, June 21, 2010

Designer Secrets - The Hand of the Fabric


The hand of the fabric is a term not generally used by Knitters. It's a definition that generally exists in sewing and clothing manufacturing venues. It is however a nuance of fabric creation that Knitters would benefit by understanding. It refers to the characteristics of the fabric being created. Many of those qualities are determined by the fibers that you are working with. The gauge that the yarn is knit at will also have an impact on "hand" as well as the original spinning method used for the yarn. It has a large impact on whether you will be happy with the end product coming from your efforts. Understanding the qualities of hand will also help you to achieve successful yarn substitutions. A stunning design can be ruined or enhanced by yarn choice. A gorgeous yarn can be wasted when used in a project that fails to showcase its best qualities.

Yarn falls into three categories: protein, vegetable or synthetic. Each one of these categories has specific qualities related to that particular category. The length of the staple fiber also has an impact on the resulting fabric. I'll do some future posts that will focus on individual fibers.

Hand really just means how does the knitted fabric feel. The following are terms that you should become familiar with to begin to educate yourself on the concept of hand. Many of these are intuitive but if you start analyzing your swatches while thinking about these qualities I guarantee that your end results will be improved. What you are aiming for is an overall comparison of performance between all your knitted fabrics in relative terms. Do this after your swatch has been blocked and you have achieved the correct gauge. Take your swatch and think about these qualities. Is it stiff, crunchy or does it drape. Will it stretch out of shape becoming to long? Do you need to compensate and knit the pieces shorter? Is the surface smooth, rough, scratchy or fuzzy? Crush it in your hand. Do wrinkles appear or does it immediately pop back to its original shape? Is the knitting springy? Are the stitches lofty or flat? Is it soft enough to wear against bare skin or will you need to have a garment between the knitting and your body? Did you knit a swatch with a border? If you did compare how the yarn behaved when different stitches were used. What about temperature? Some yarns feel cool to the touch and make great summer projects. What about pilling? Is this a yarn that abrasion will cause pilling under the arms? Is it stretchy or limp? Is the swatch thin or thick? Are the stitches close together or so far apart that you can see the yarn between the column of stitches in stocking stitch?

Do this analysis on all of your projects both on the swatch and on the finished item and think about how you could improve each project. The subtlety of what you are learning will improve all of your future knitting projects. I promise!